Metadata and Reports
YoYotta automatically extracts camera and checksum metadata
Additional metadata can be added manually or imported from ALE and CSV files
YoYotta v4 camera formats supported for metadata and thumbnails
- ARRI ALEXA 65 ARRIRAW ARI and HDE ARX
- ARRI ALEXA 35 ARRICORE, ARRIRAW and HDE ARRIRAW MXF, ProRes
- ARRI ALEXA LF ARRIRAW, ProRes
- ARRI ALEXA SXT ARRIRAW, ProRes
- ARRI ALEXA XT ARRIRAW, ProRes (including 4444 XQ), DNxHD
- ARRI ALEXA ARRIRAW, ARI and HDE ARX
- ARRI ALEXA XT ARRIRAW, ProRes (including 4444 XQ), DNxHD
- ARRI Mini LF ARRIRAW MXF
- ALEXA Mini LF MXF wrapped ProRes requires Apple Pro Video Formats 2.4 or newer
- ARRI AMIRA MXF wrapped ARRIRAW, ProRes, MPEG2
- Avid DNxHD and DNxHR MOV and MXF
- Blackmagic BRAW including BMD URSA Mini Pro 12K
- Codex HDE (Compressed ARRIRAW, stored as ARX image sequences or MXF)
- Sony Venice 2 MXF wrapped ProRes requires Apple Pro Video Formats 2.4 or newer
- Sony F700, F5, F55, VENICE and F65, formats MPEG2, XAVC, X-OCN, 2K, 4K RAW
- Sony FS7 XAVC, MPEG and ProRes
- Sony X70 XAVC
- RED V-RAPTOR, KOMODO, WEAPON, EPIC, SCARLET, RAVEN, RED ONE, formats R3D, ProRes, DNxHD
- Panasonic VariCam AVC-Intra 4K and 2K, GH5 Long GOP, VariCam LT DNG, EVA1 MOV + AVCHD
- Phantom CINE
- DPX sequences
- DNG sequences (Like Finder QuickLook not all versions of DNG are supported)
- Canon 5D, 7D, 60D, 500D H.264 MOV
- Canon XF705 HEVC
- Canon C200 MP4, C300, C500, C700 XDCAM MXF
- Canon C200, C500 MKII RAW CRM
- DSLR CR2, CR3, NEF, TIF, TIFF, JPG, JPEG
- GoPro H.264 and H.265
Camera metadata
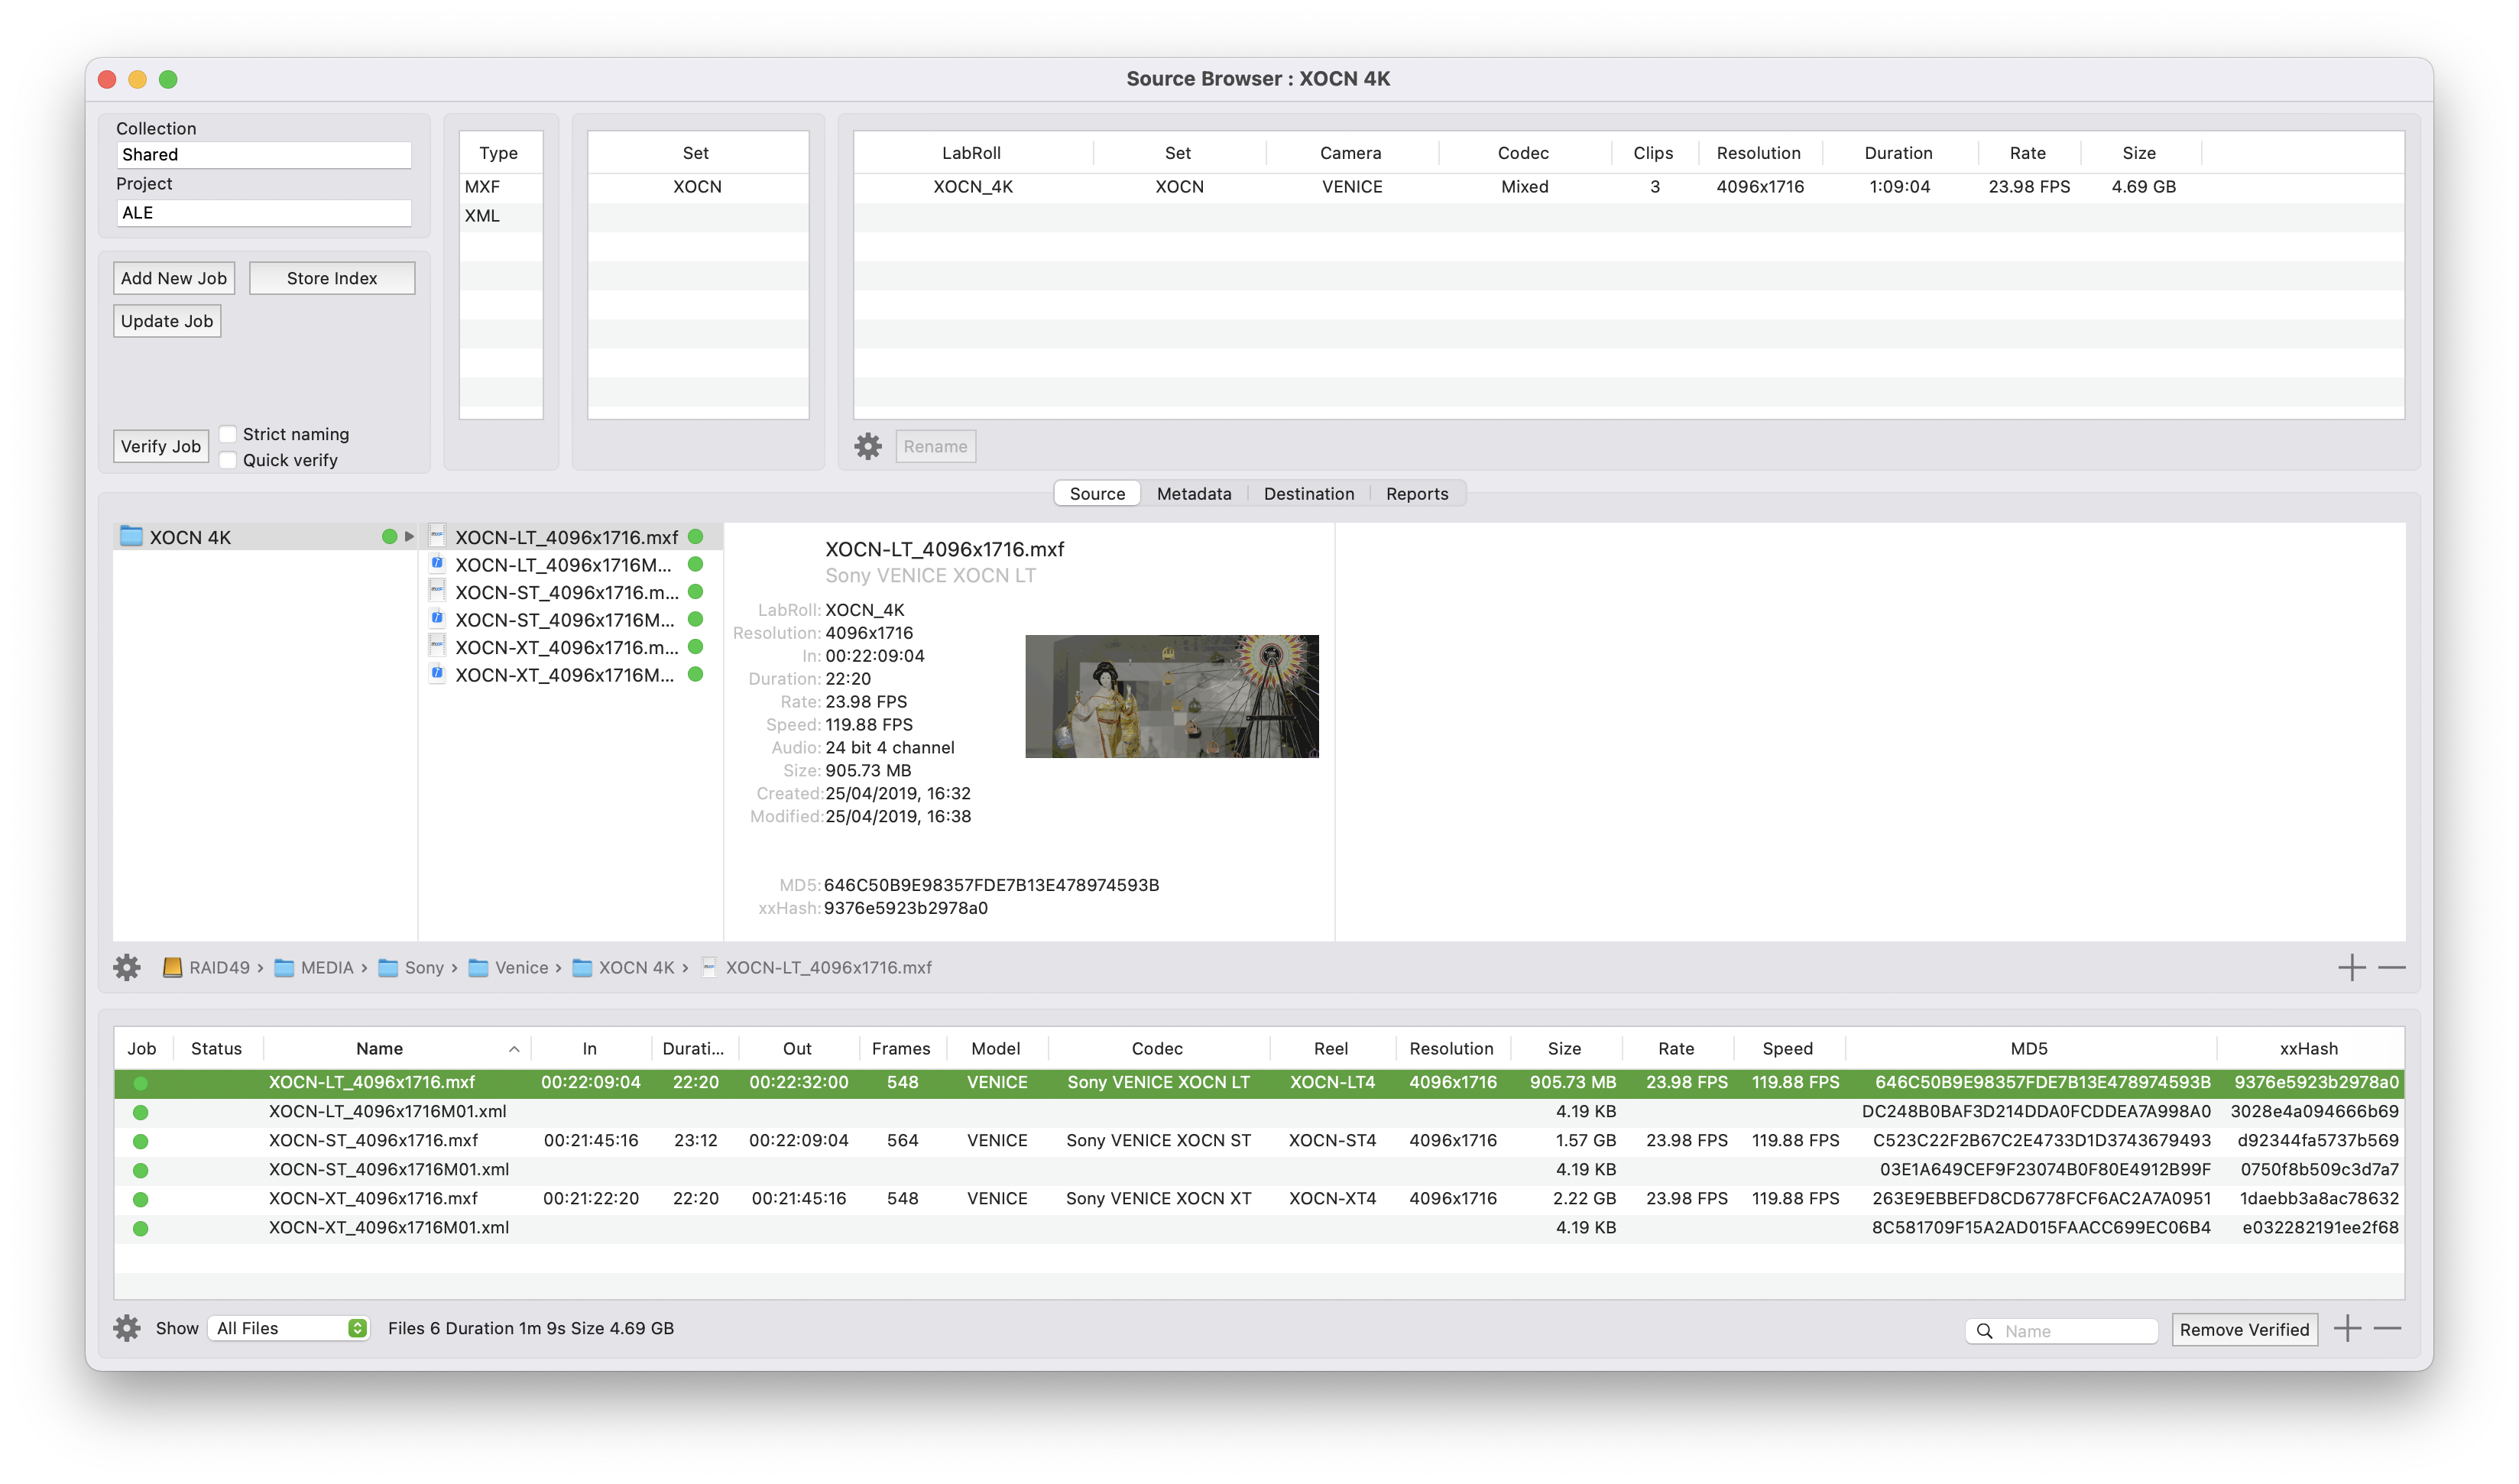
When indexing a camera card or source drive, YoYotta can optionally extract detailed metadata from each clip. Open the Source Browser to view it.
To enable this, turn on Extract metadata in Preferences.
This metadata is stored in the project so you can later filter by codec, resolution, and more in the Project Browser to quickly locate clips for restore.
If YoYotta cannot read metadata from a clip, a warning will appear in the user log panel: "Warning: cannot extract metadata from file, it will still be copied".
Those clips are marked orange in the Status column in the Source Browser file table.
If every clip from a particular camera shows this warning, updating YoYotta may enable decoding, see the supported formats list on this page.
If only one clip is affected, the file may be corrupted. YoYotta will still make an exact copy of the file, but you may want to confirm the clip plays back.
Tapes written by YoYotta include embedded metadata which will be read during indexing. However LTFS tapes written by other software typically won’t have embedded metadata, and extracting it from each clip can take too long.
Creating metadata also takes time when working with large source drives or volumes. Metadata is optional and can be turned off without affecting the archive.
When turned off, basic metadata including file name, size, creation date, and modification date will still be extracted. Also, when a job is run previous checksums will be read from the source file’s metadata and used for verification.
If you need metadata for only a few clips on a tape that has been written using other archive software, open the Source Browser and select one or more folders, open the Folder pop-up menu, and click Extract Metadata. Be prepared as this will take some time.
ARRI ALEXA Mini LF and Sony Venice 2 MXF-wrapped ProRes require Apple Pro Video Formats 2.4 or newer to be installed
Checksum metadata
The Parse ALE, MHL, MD5 files preference enables parsing during indexing of checksums from metadata files inside all folders on the source media. After indexing these checksums will be visible in the Source Browser.
MHL is a standard, so it's easy for YoYotta to find file names, sizes and checksums. During indexing a message saying n files checked using XXX.mhl message will appear in the log.
MD5 files are less standard as there are various different formats. During indexing a status message Using external checksums from YYY.md5 message will appear in the log.
ALE is easy to parse, but the metadata items can have any header name so they might not match with the one that YoYotta is expecting. See the User metadata section below for a list of the ALE header names that YoYotta looks for. Note that ALE files might not include any checksums.
To see if YoYotta found any checksums, open the Source Browser as both MD5 and xxHash values are shown in the file table and also in the detail view.
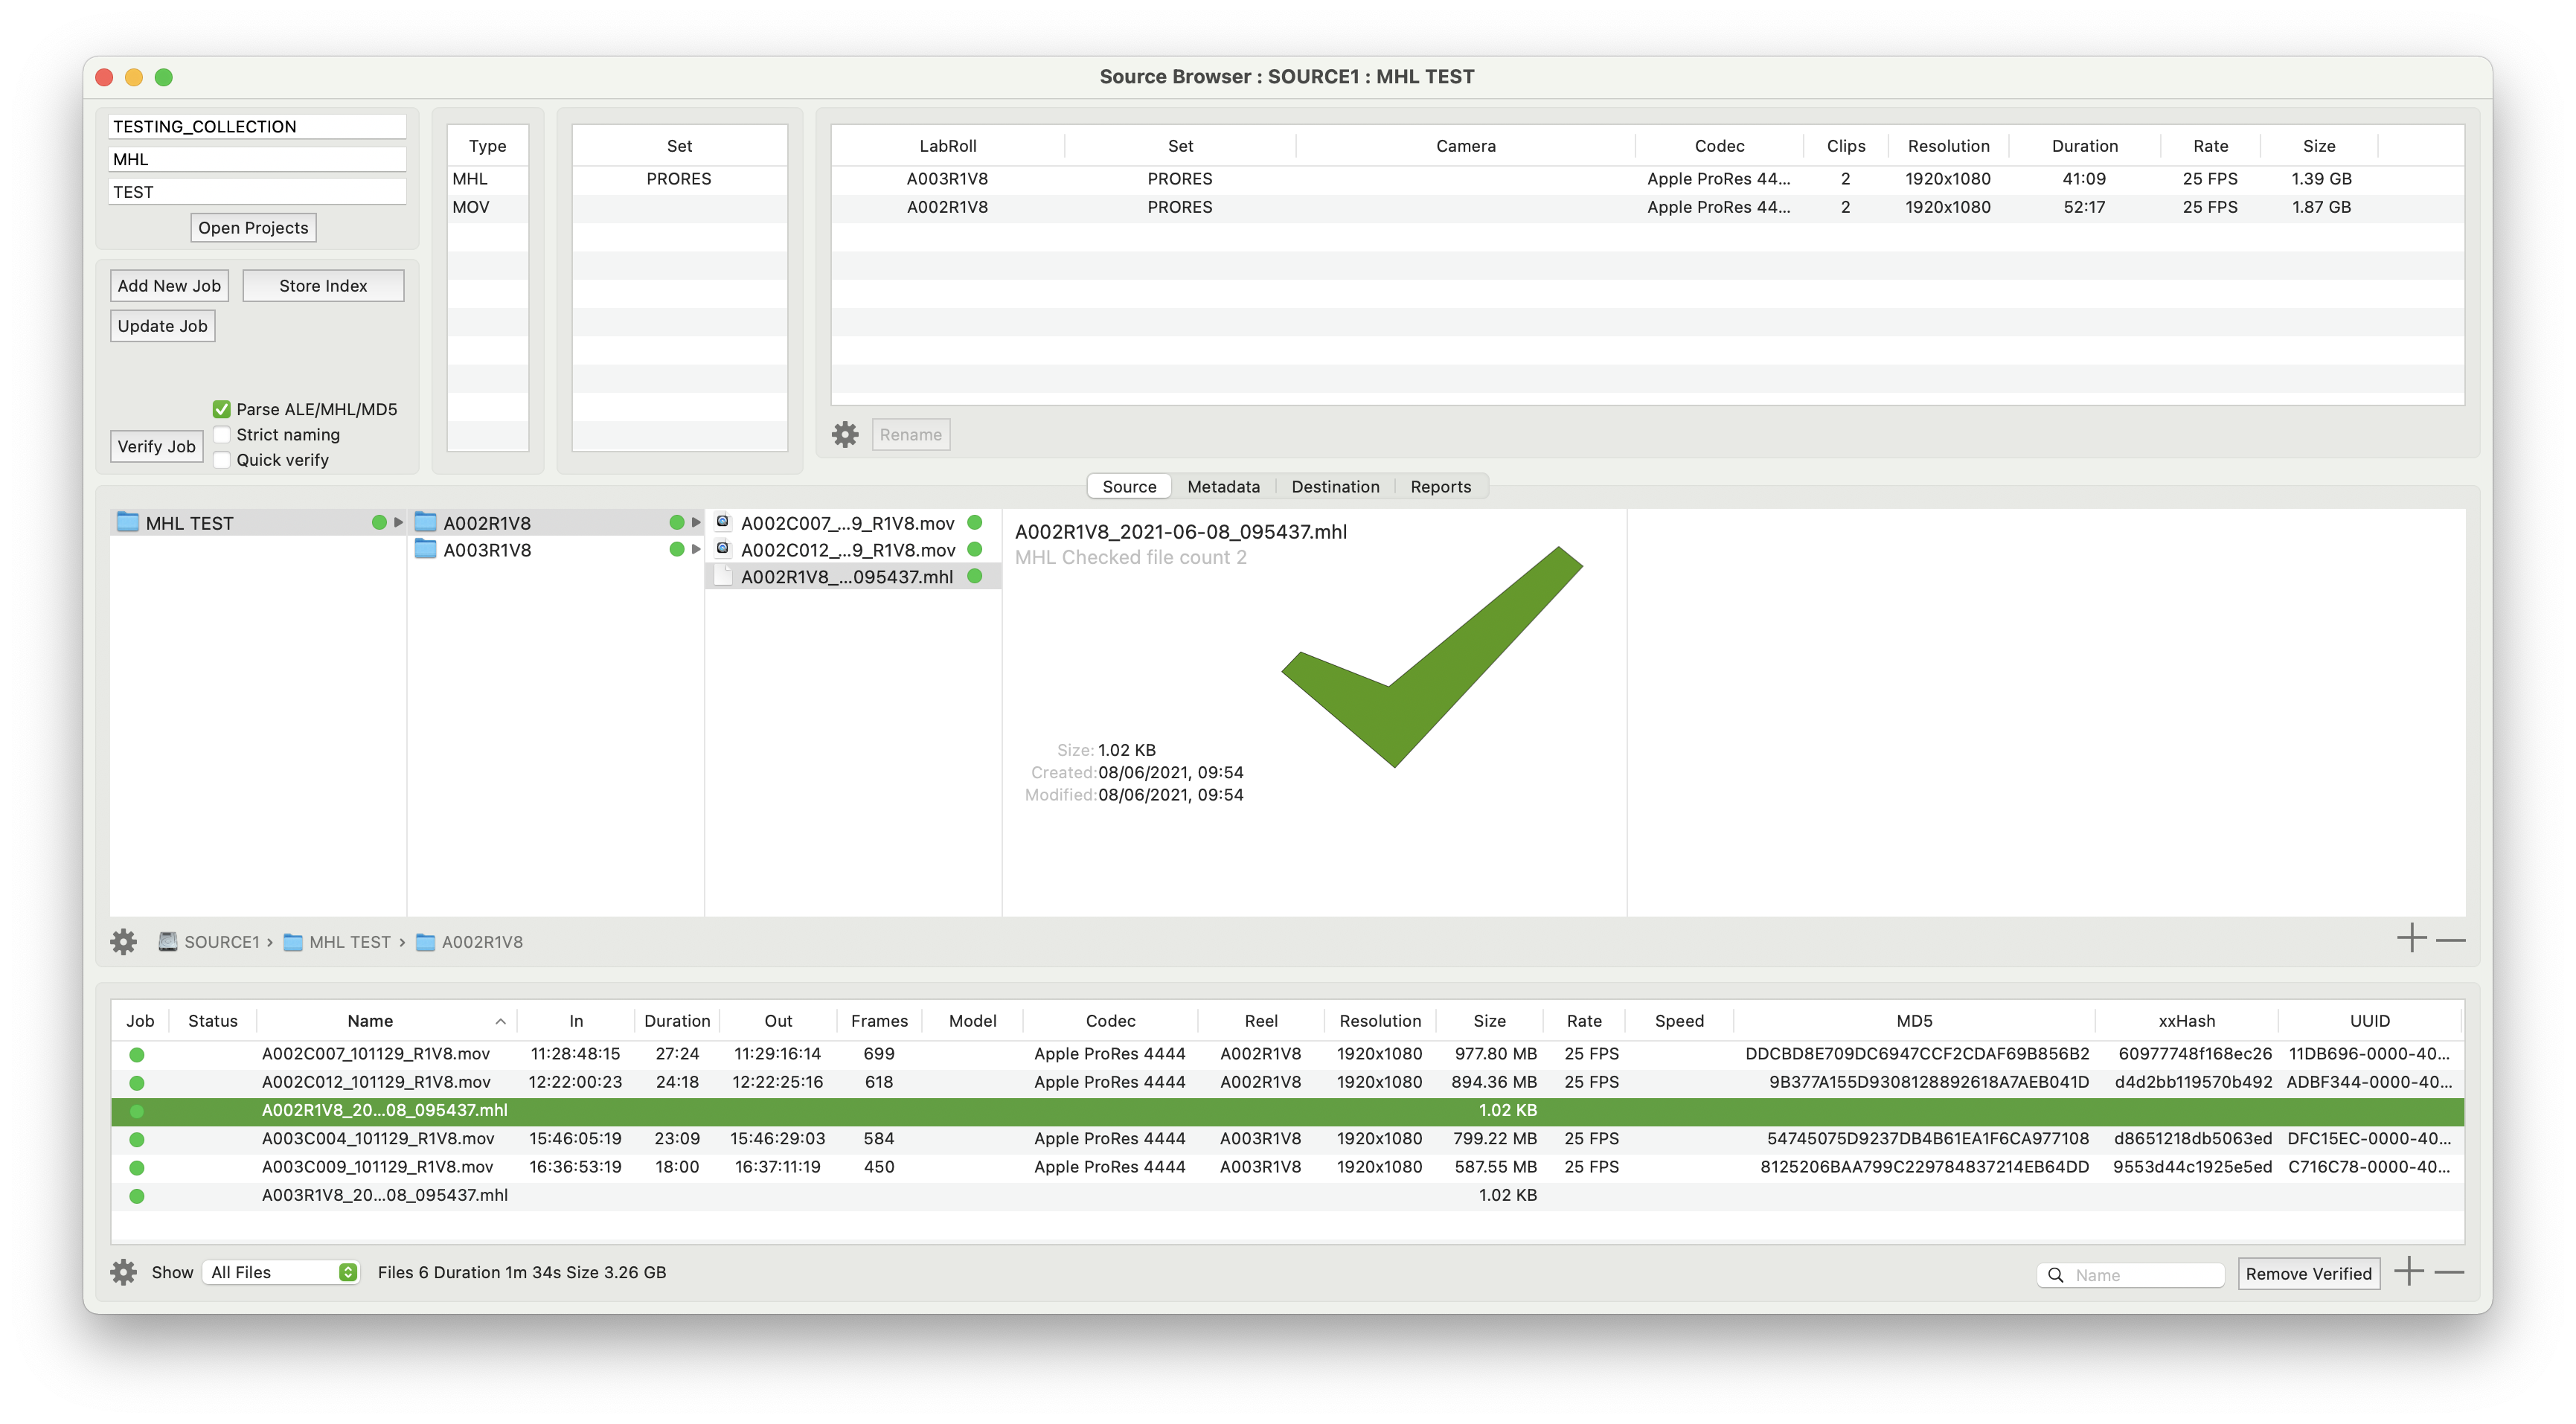
In the indexed files shown in this screenshot there are two MHL files, one for each camera card folder. See the checkbox in the top left showing that Parsing MHL metadata files is enabled. YoYotta has parsed the MD5 and xxHash values from the MHL files and the checksums are visible for each MOV file.
Also selecting an MHL shows a green tick which means that the number of files in the MHL matches the number of files in the folder.
However there is no need to check each file as YoYotta will warn if there are any mismatches before starting the job. Then during the job YoYotta will warn if any files don't match the previous checksums.
It's possible to export metadata reports in all these formats from the Project Browser and they can used as examples for 3rd party development.
YoYotta will warn in the log if any files listed in the checksum files are missing. During the copy YoYotta will calculate new checksum values for every file and compare against the parsed checksums.
If the source was previously copied and verified using YoYotta, then the file checksums will be automatically added without needing any MD5 or MHL files.
User metadata
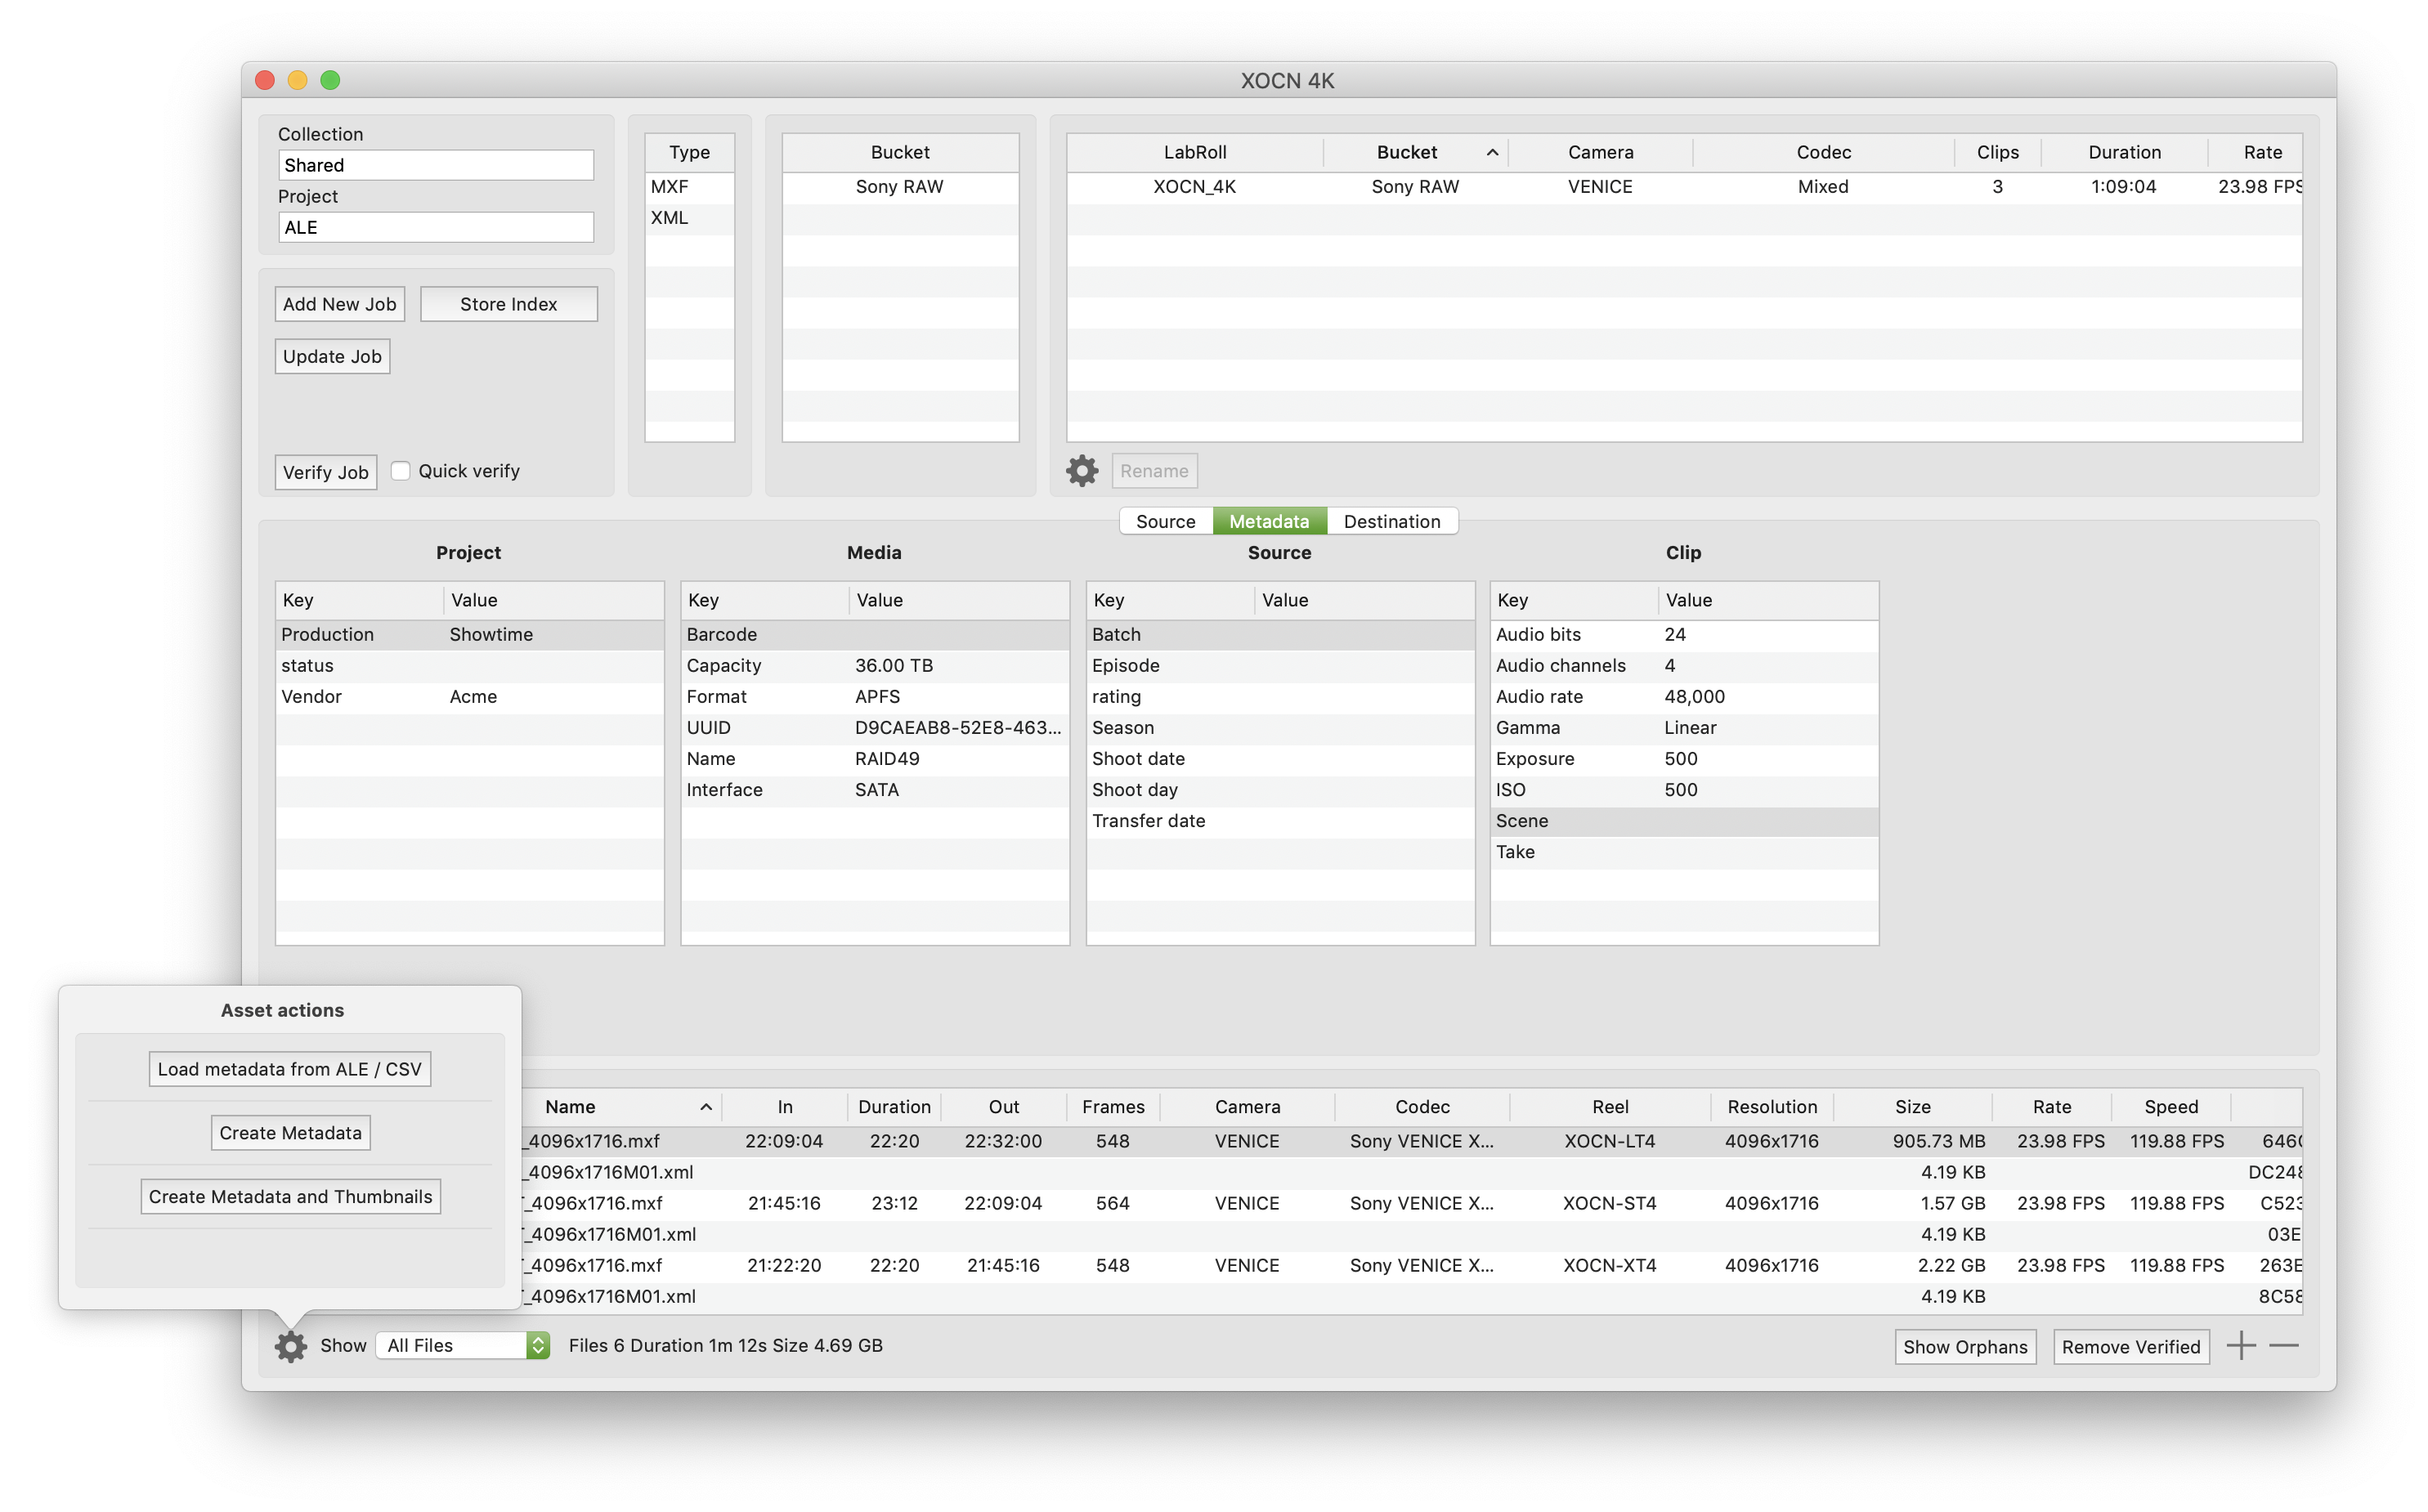
Click on the Metadata tab in the Source Browser and select a clip. Project, Media, Source and Clip Metadata can be added or modified. Double click or press the enter key to open the value field for each key.
Or click the Load metadata from ALE/CSV button to add metadata from ALE or CSV files.
YoYotta will look for these column header names. The case (upper or lower) is not important and there can be spaces in the header names.
After loading metadata from an ALE or CSV every matched clip will have a green status in the Source Browser file table.
When the job is verified this extra metadata will be automatically stored in the SOURCE and COPY snapshots in the Project Browser.
If you are indexing a drive or tape and adding metadata then click Store Index to create an INDEX snapshot.
To add more metadata to existing clips export a CSV or ALE file using the Project Browser. These reports can then be used as a template when creating metadata files using 3rd party apps.
Also the User metadata can be viewed and edited using YoYotta Server.
- Project
- Production
- Vendor
- Source
- Season
- Episode
- ShootDay
- ShootDate
- TransferDate
- Batch
- Clip
- Scene
- Take
- Shot
- File
- Name
- MD5
- xxHash
Imported metadata
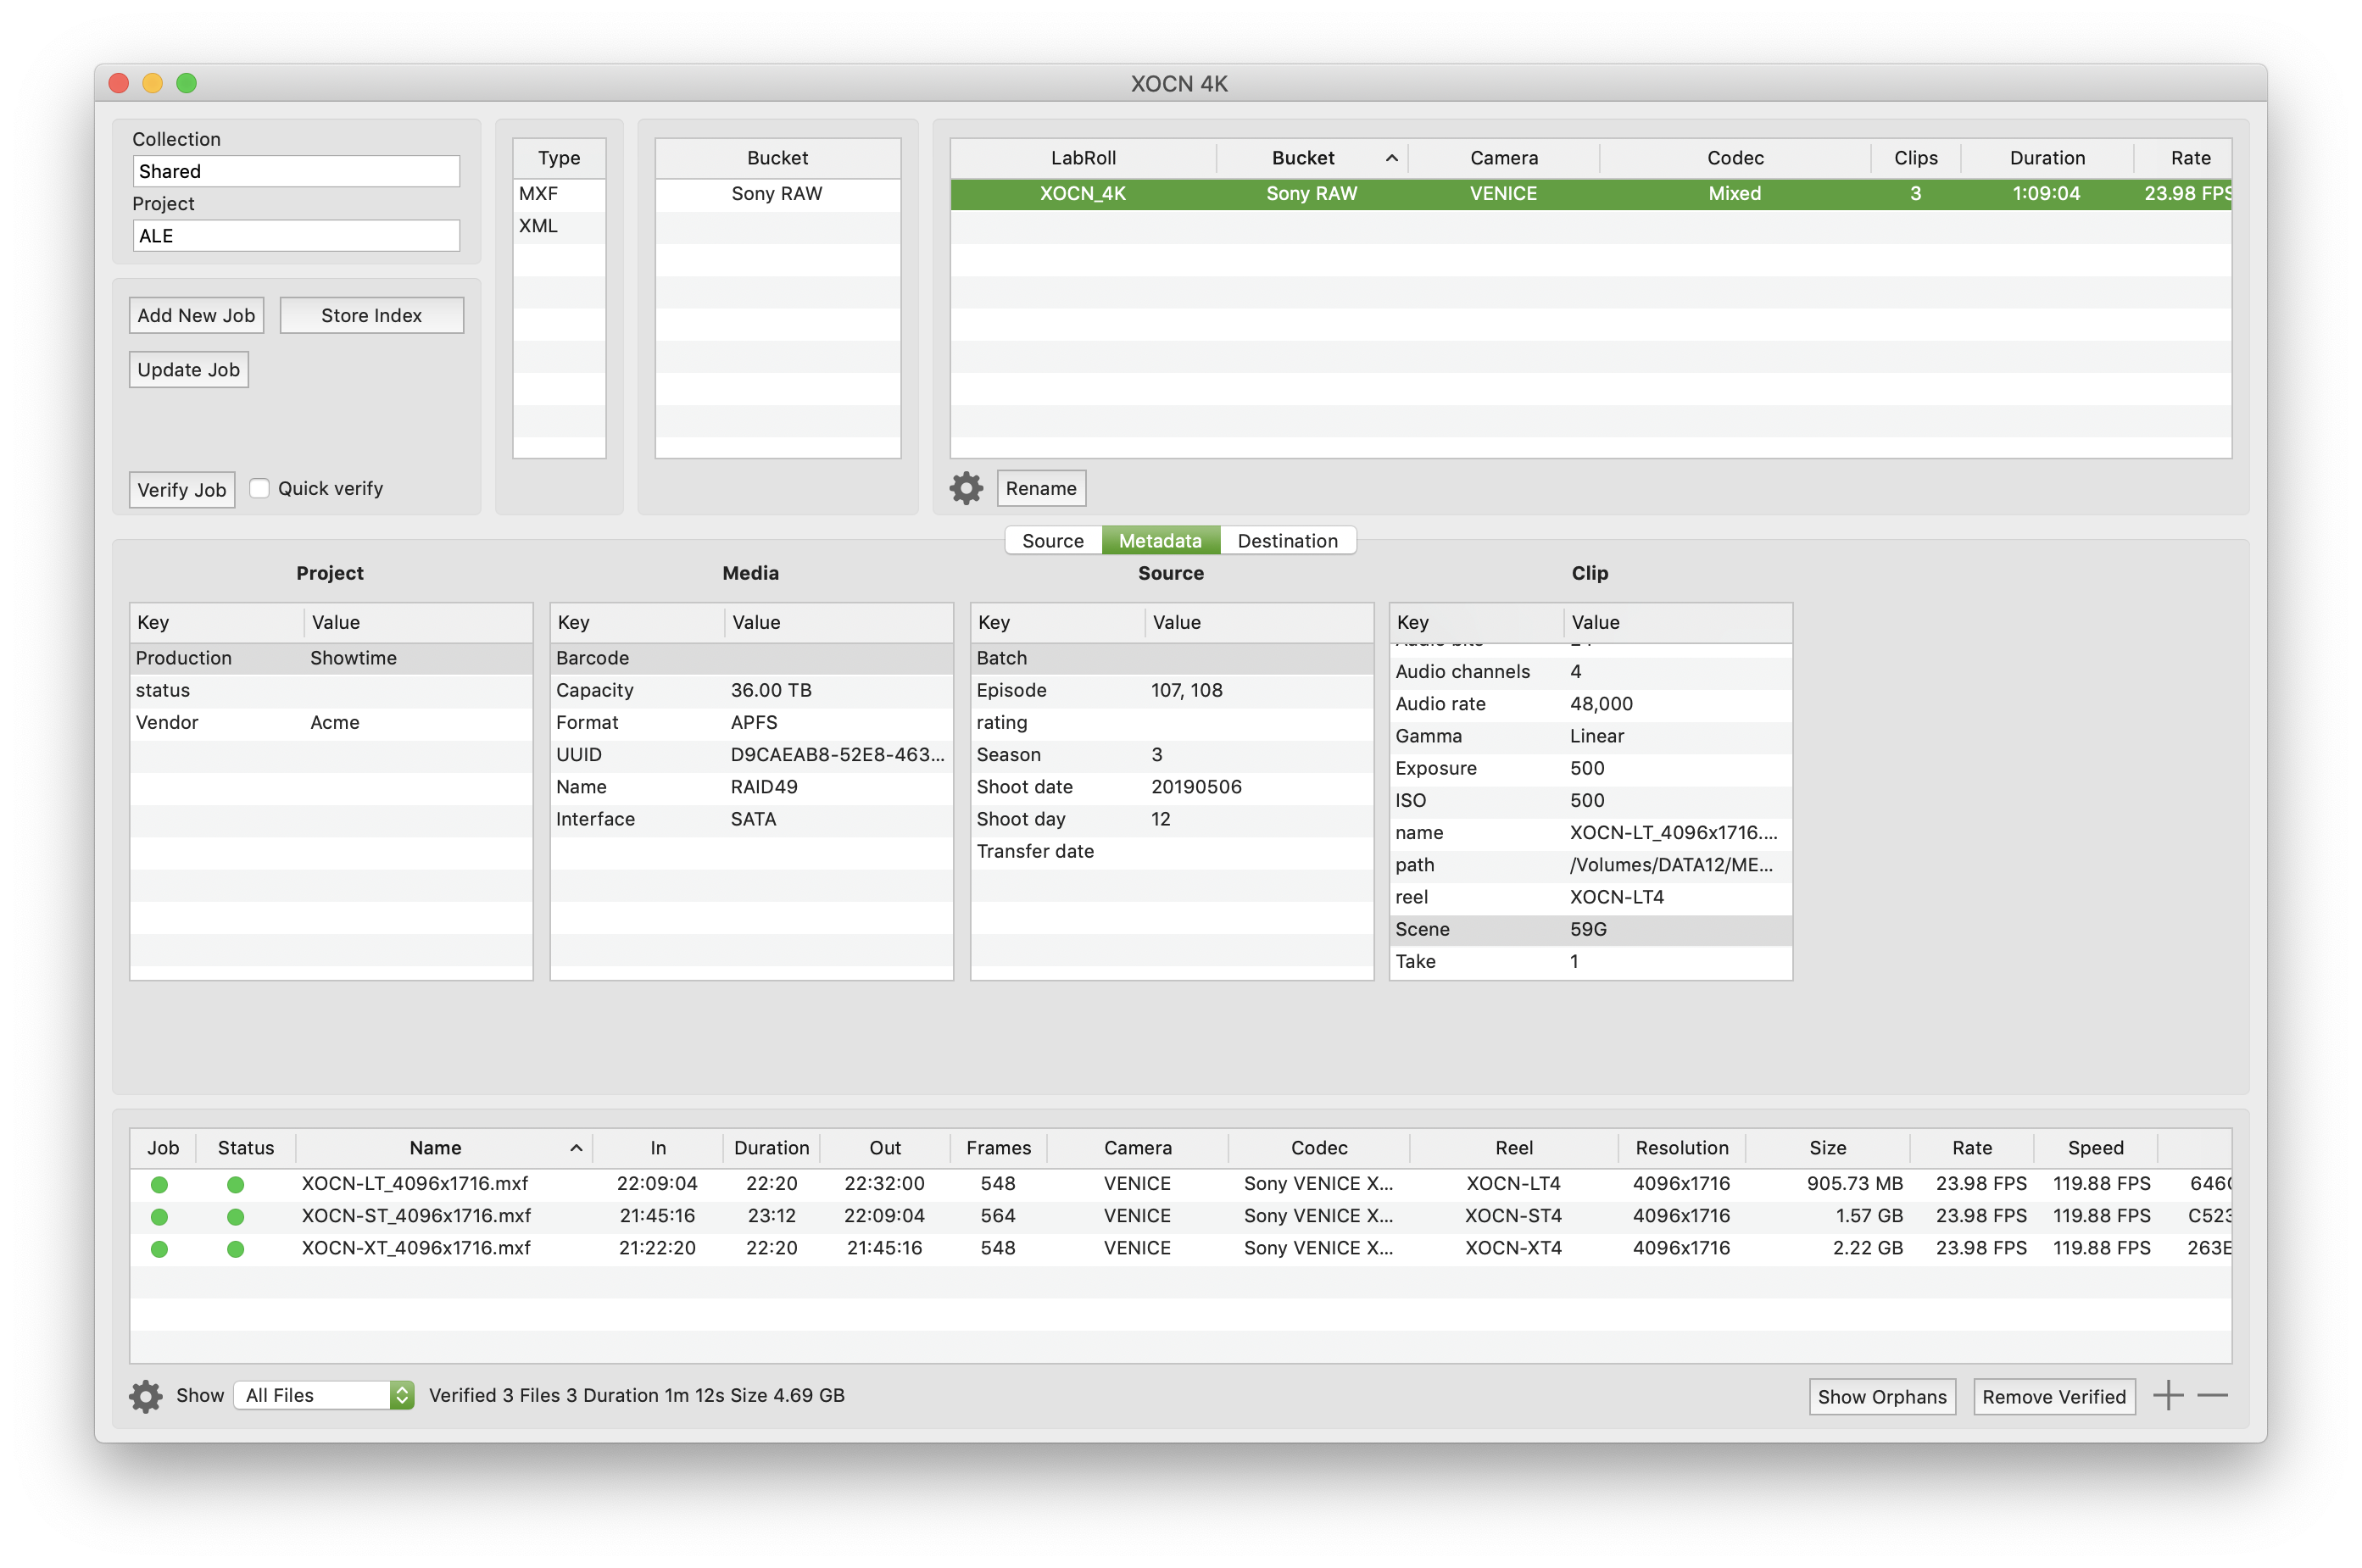
In the Source table the Season, Episode, Shoot day and Shoot date have been imported. Along with the scene and take information for each clip.
The green dot in the Status column shows that metadata has been imported for that clip.
Now start the job, when complete the job will be stored in the Project Browser and reports will be generated. Alternatively click the Store Index button to store an INDEX now.
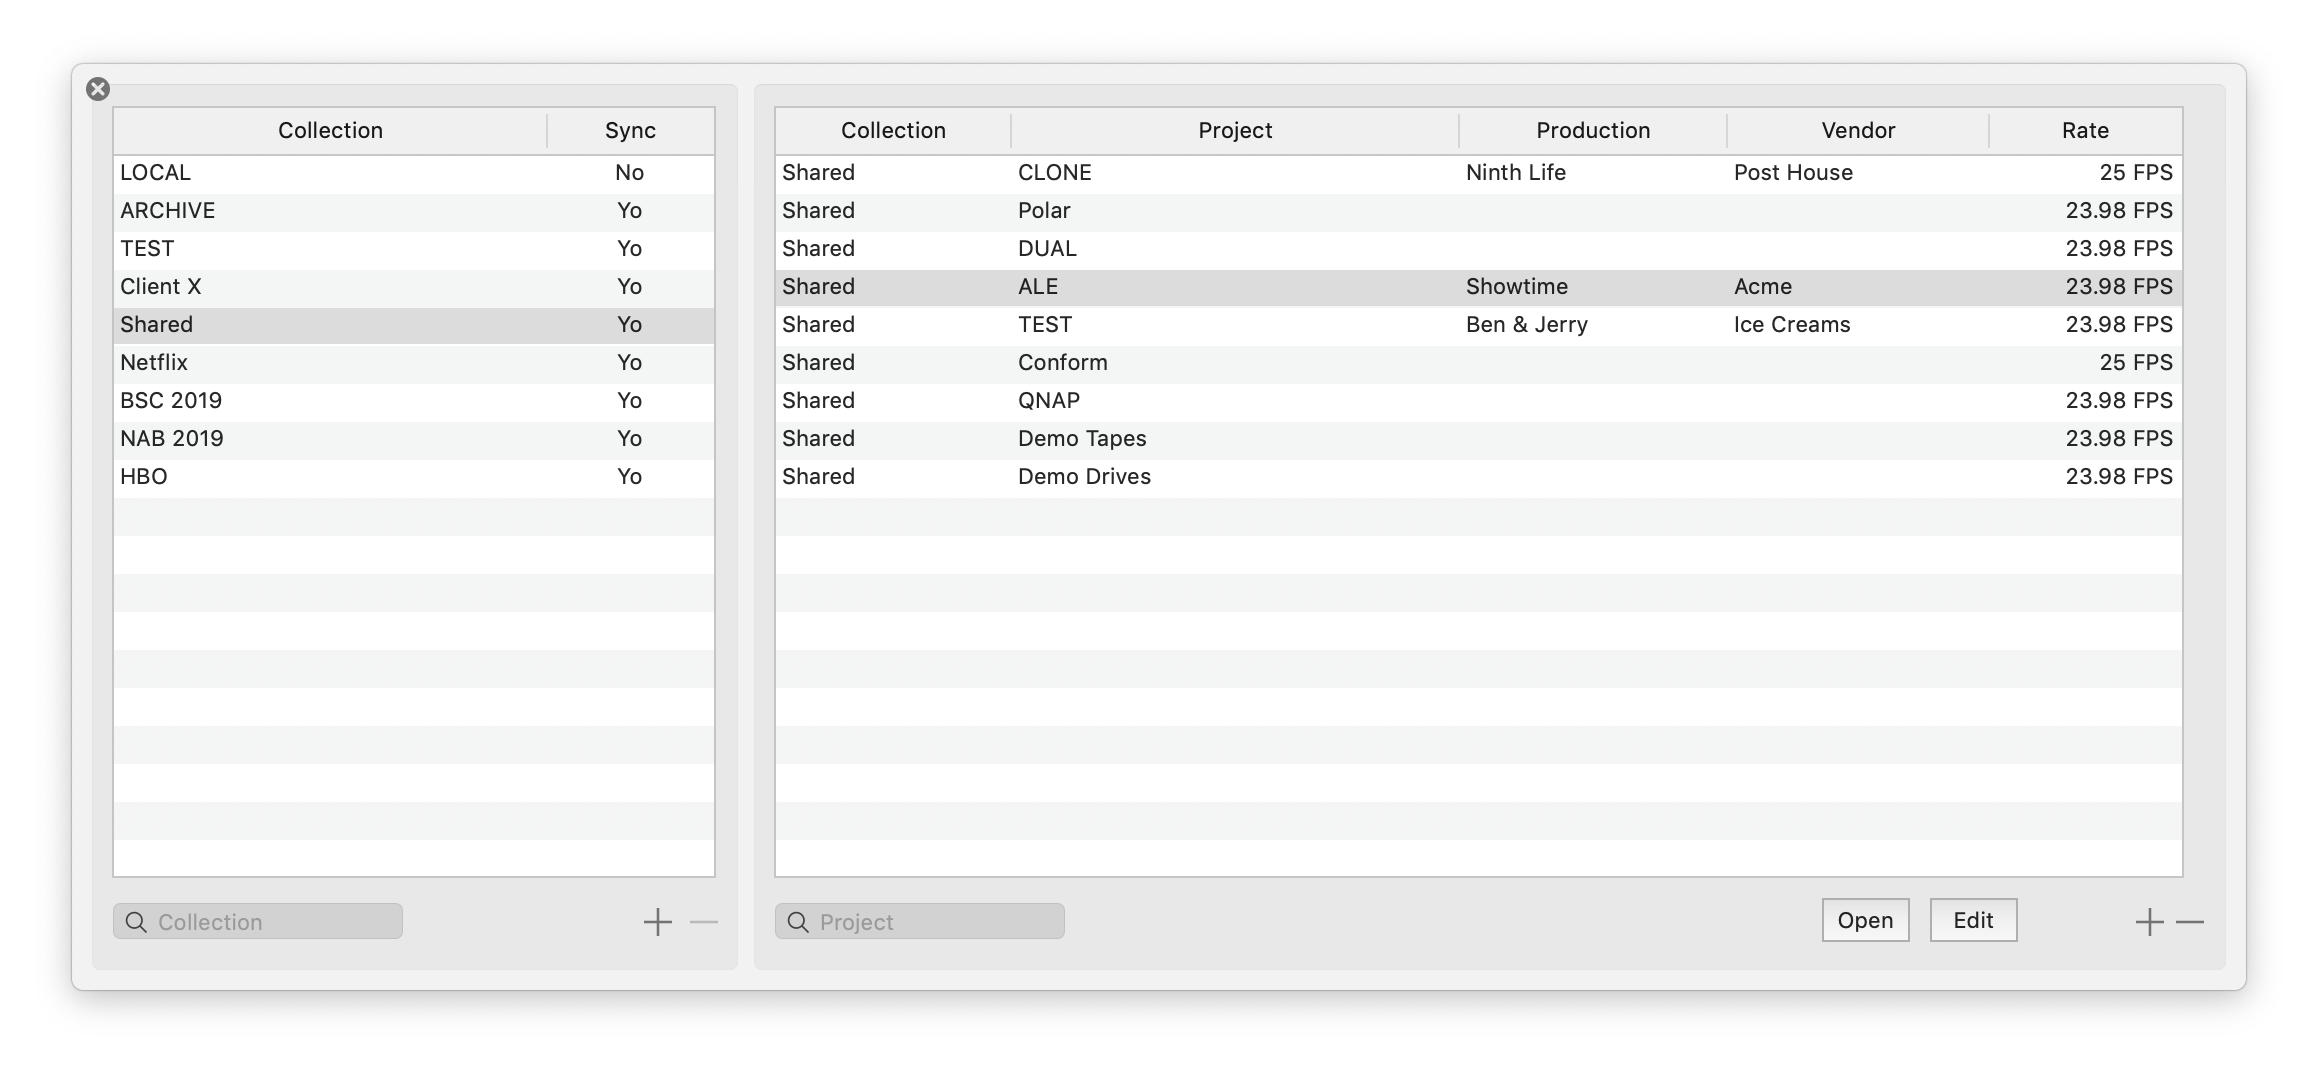
Project metadata
Imported Production and Vendor metadata from a CSV file is also shown in the Collection + Project panel.
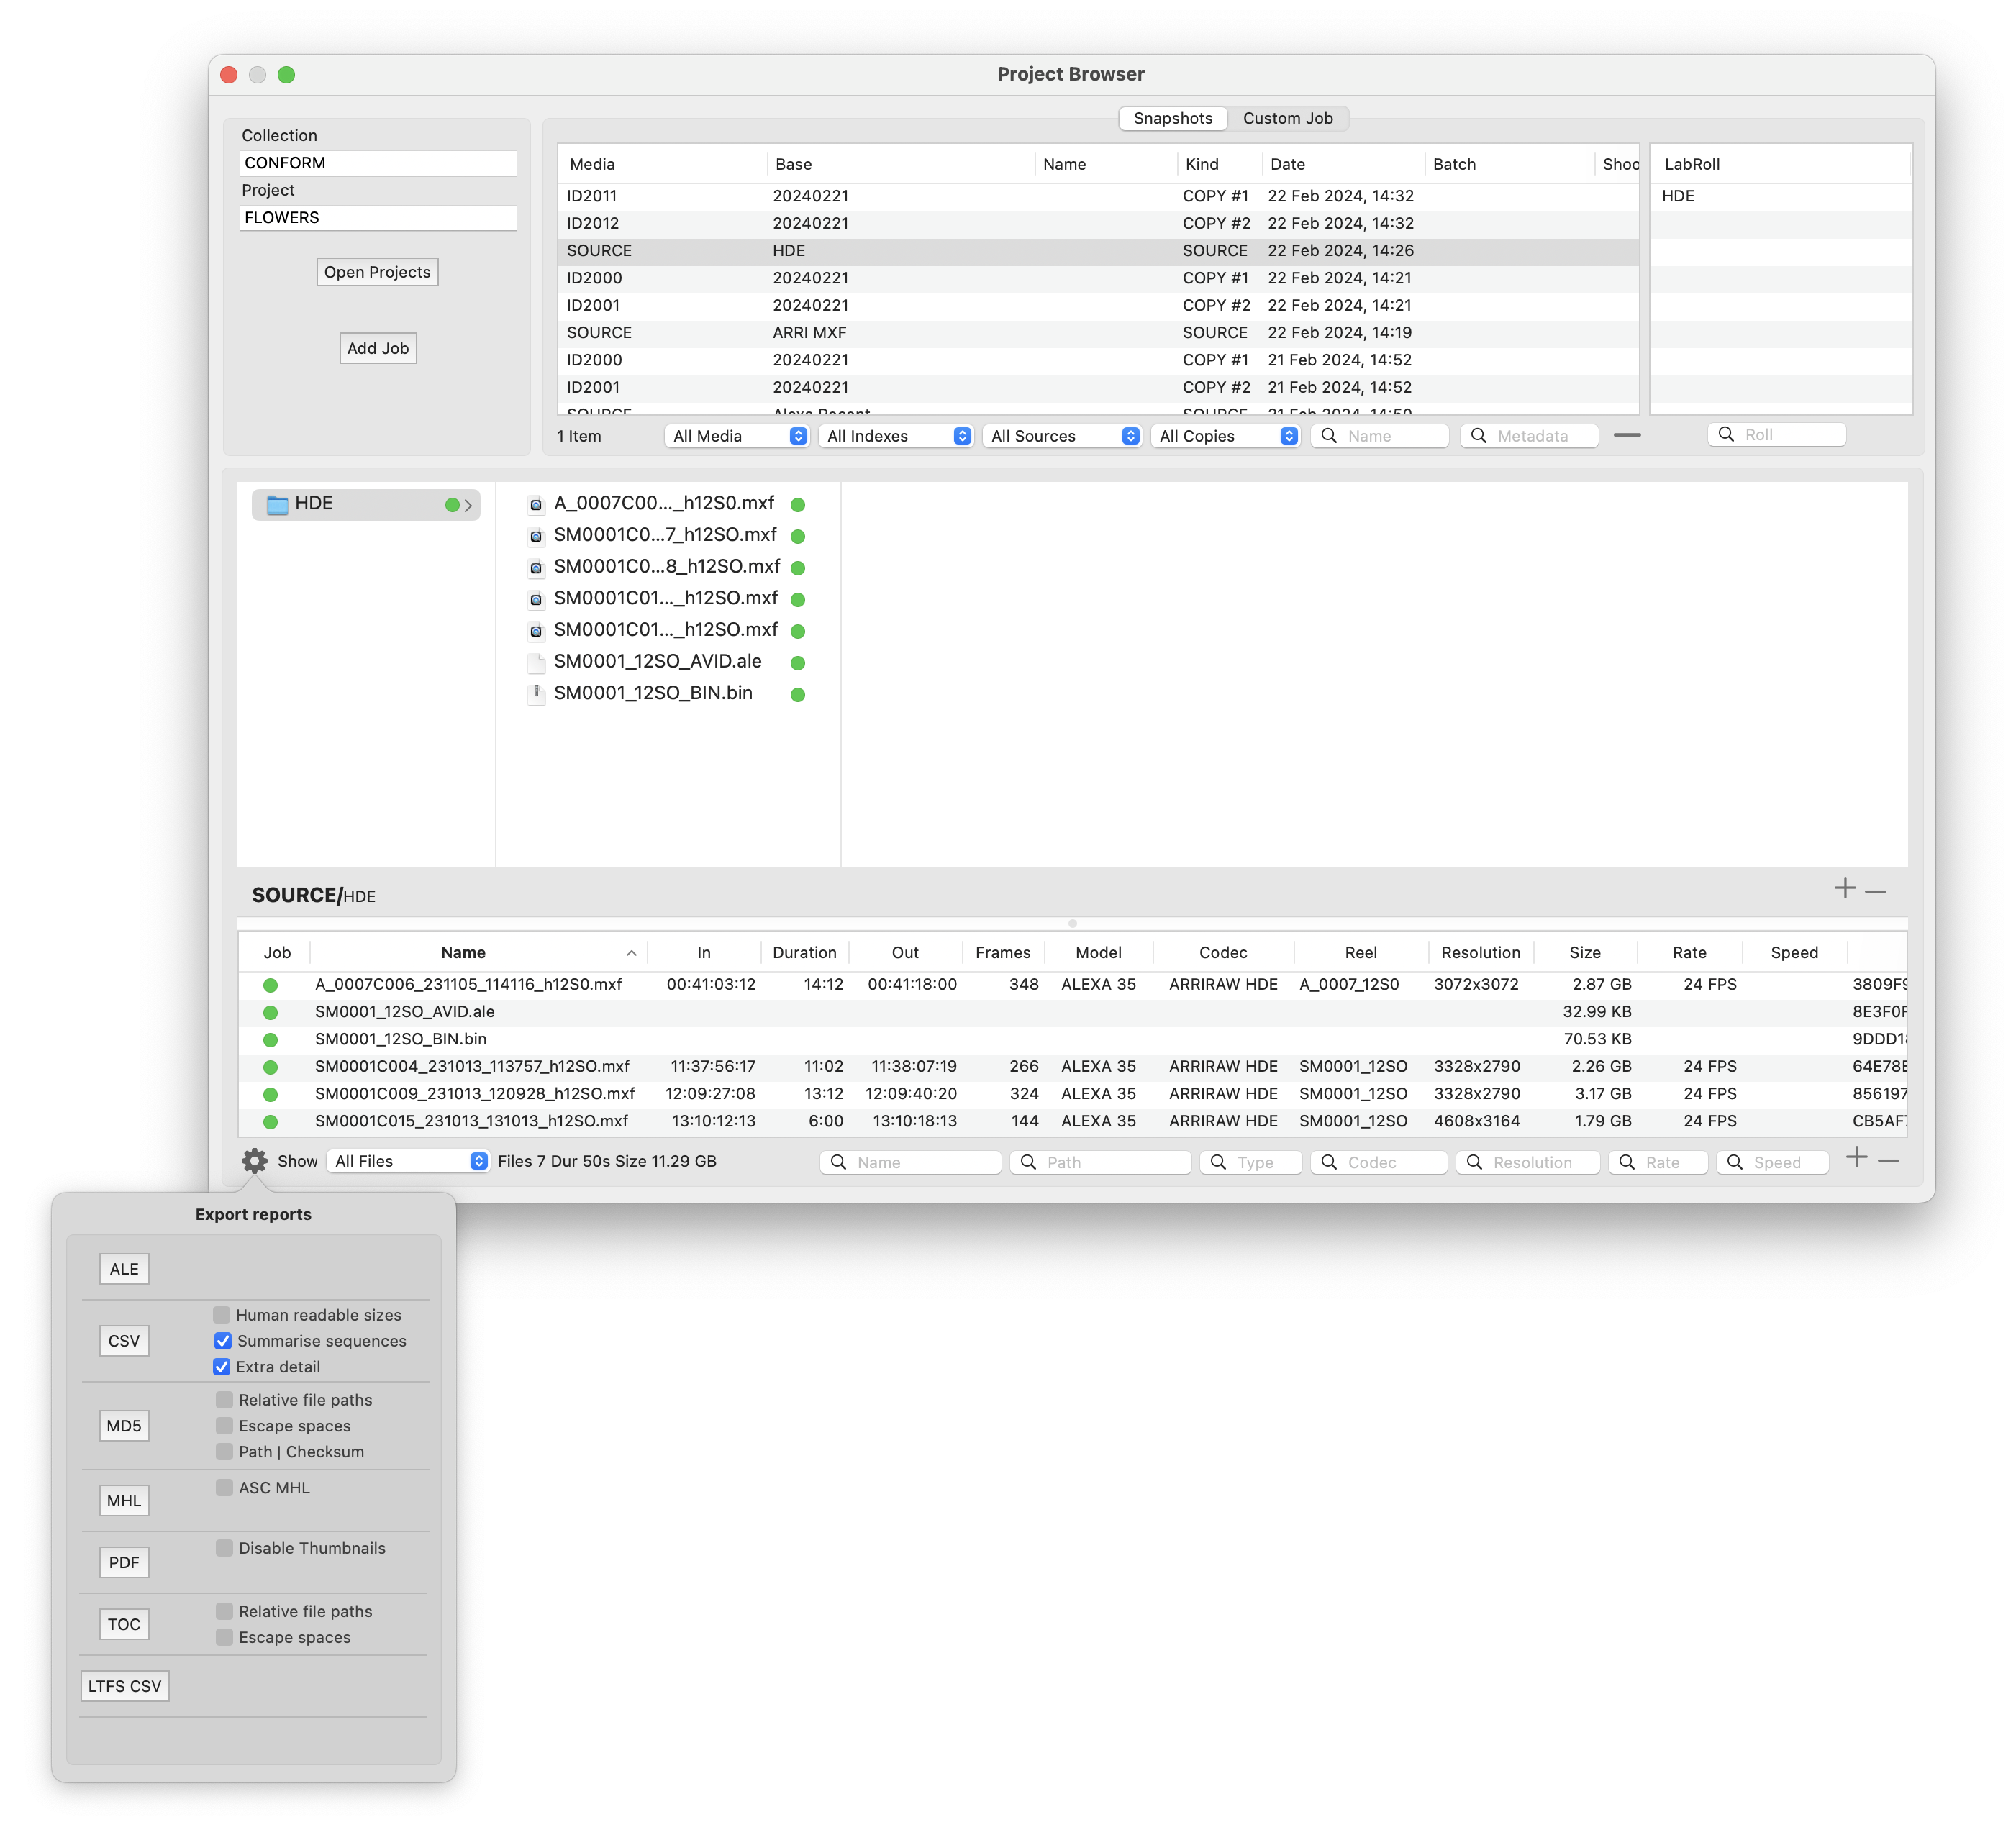
Manually creating a report
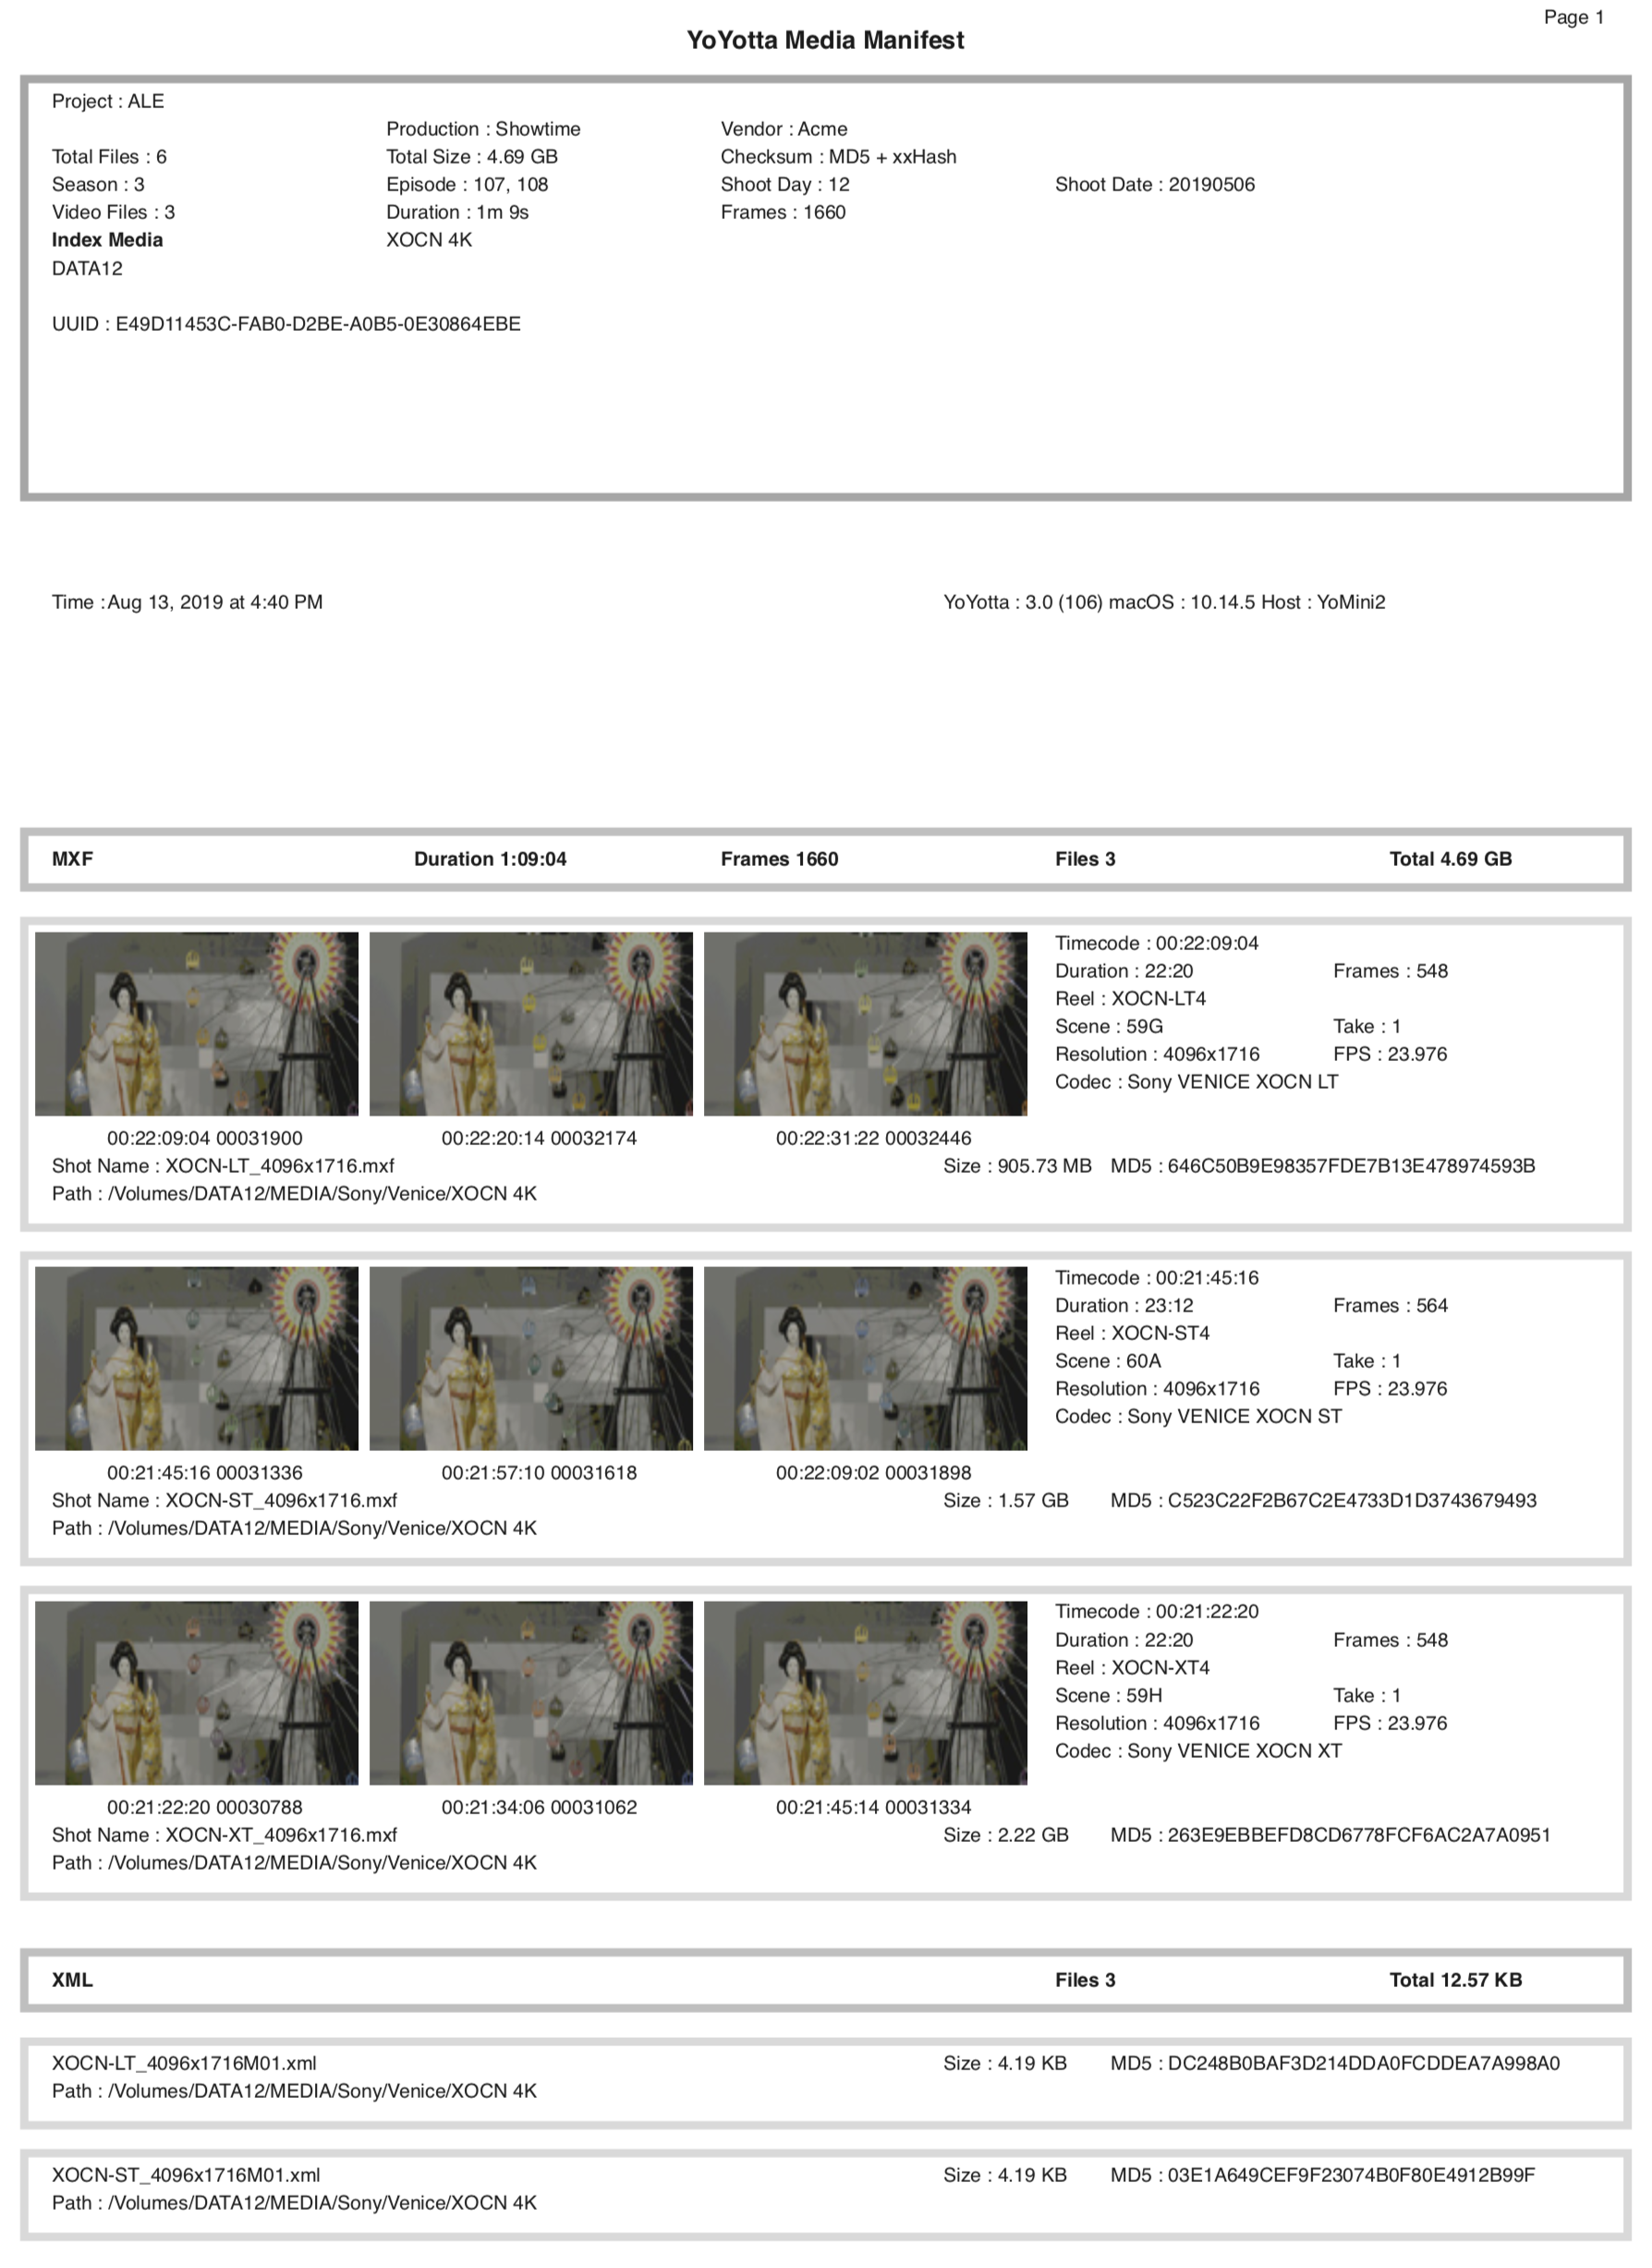
Open the Project Browser. See that the Source metadata is shown in the table. It is possible to search for matching metadata. Select a job and click the PDF button in the Export panel to create a job report.
CSV and other report formats can be exported.
Automatically exporting clip metadata
The CSV reports from YoYotta contain metadata about every file including checksums and camera clip resolution, timecode and codec.
They can be used to populate a spreadsheet or imported into external software like an asset management system.
All kinds of reports including CSV can be manually exported from the Project Browser.
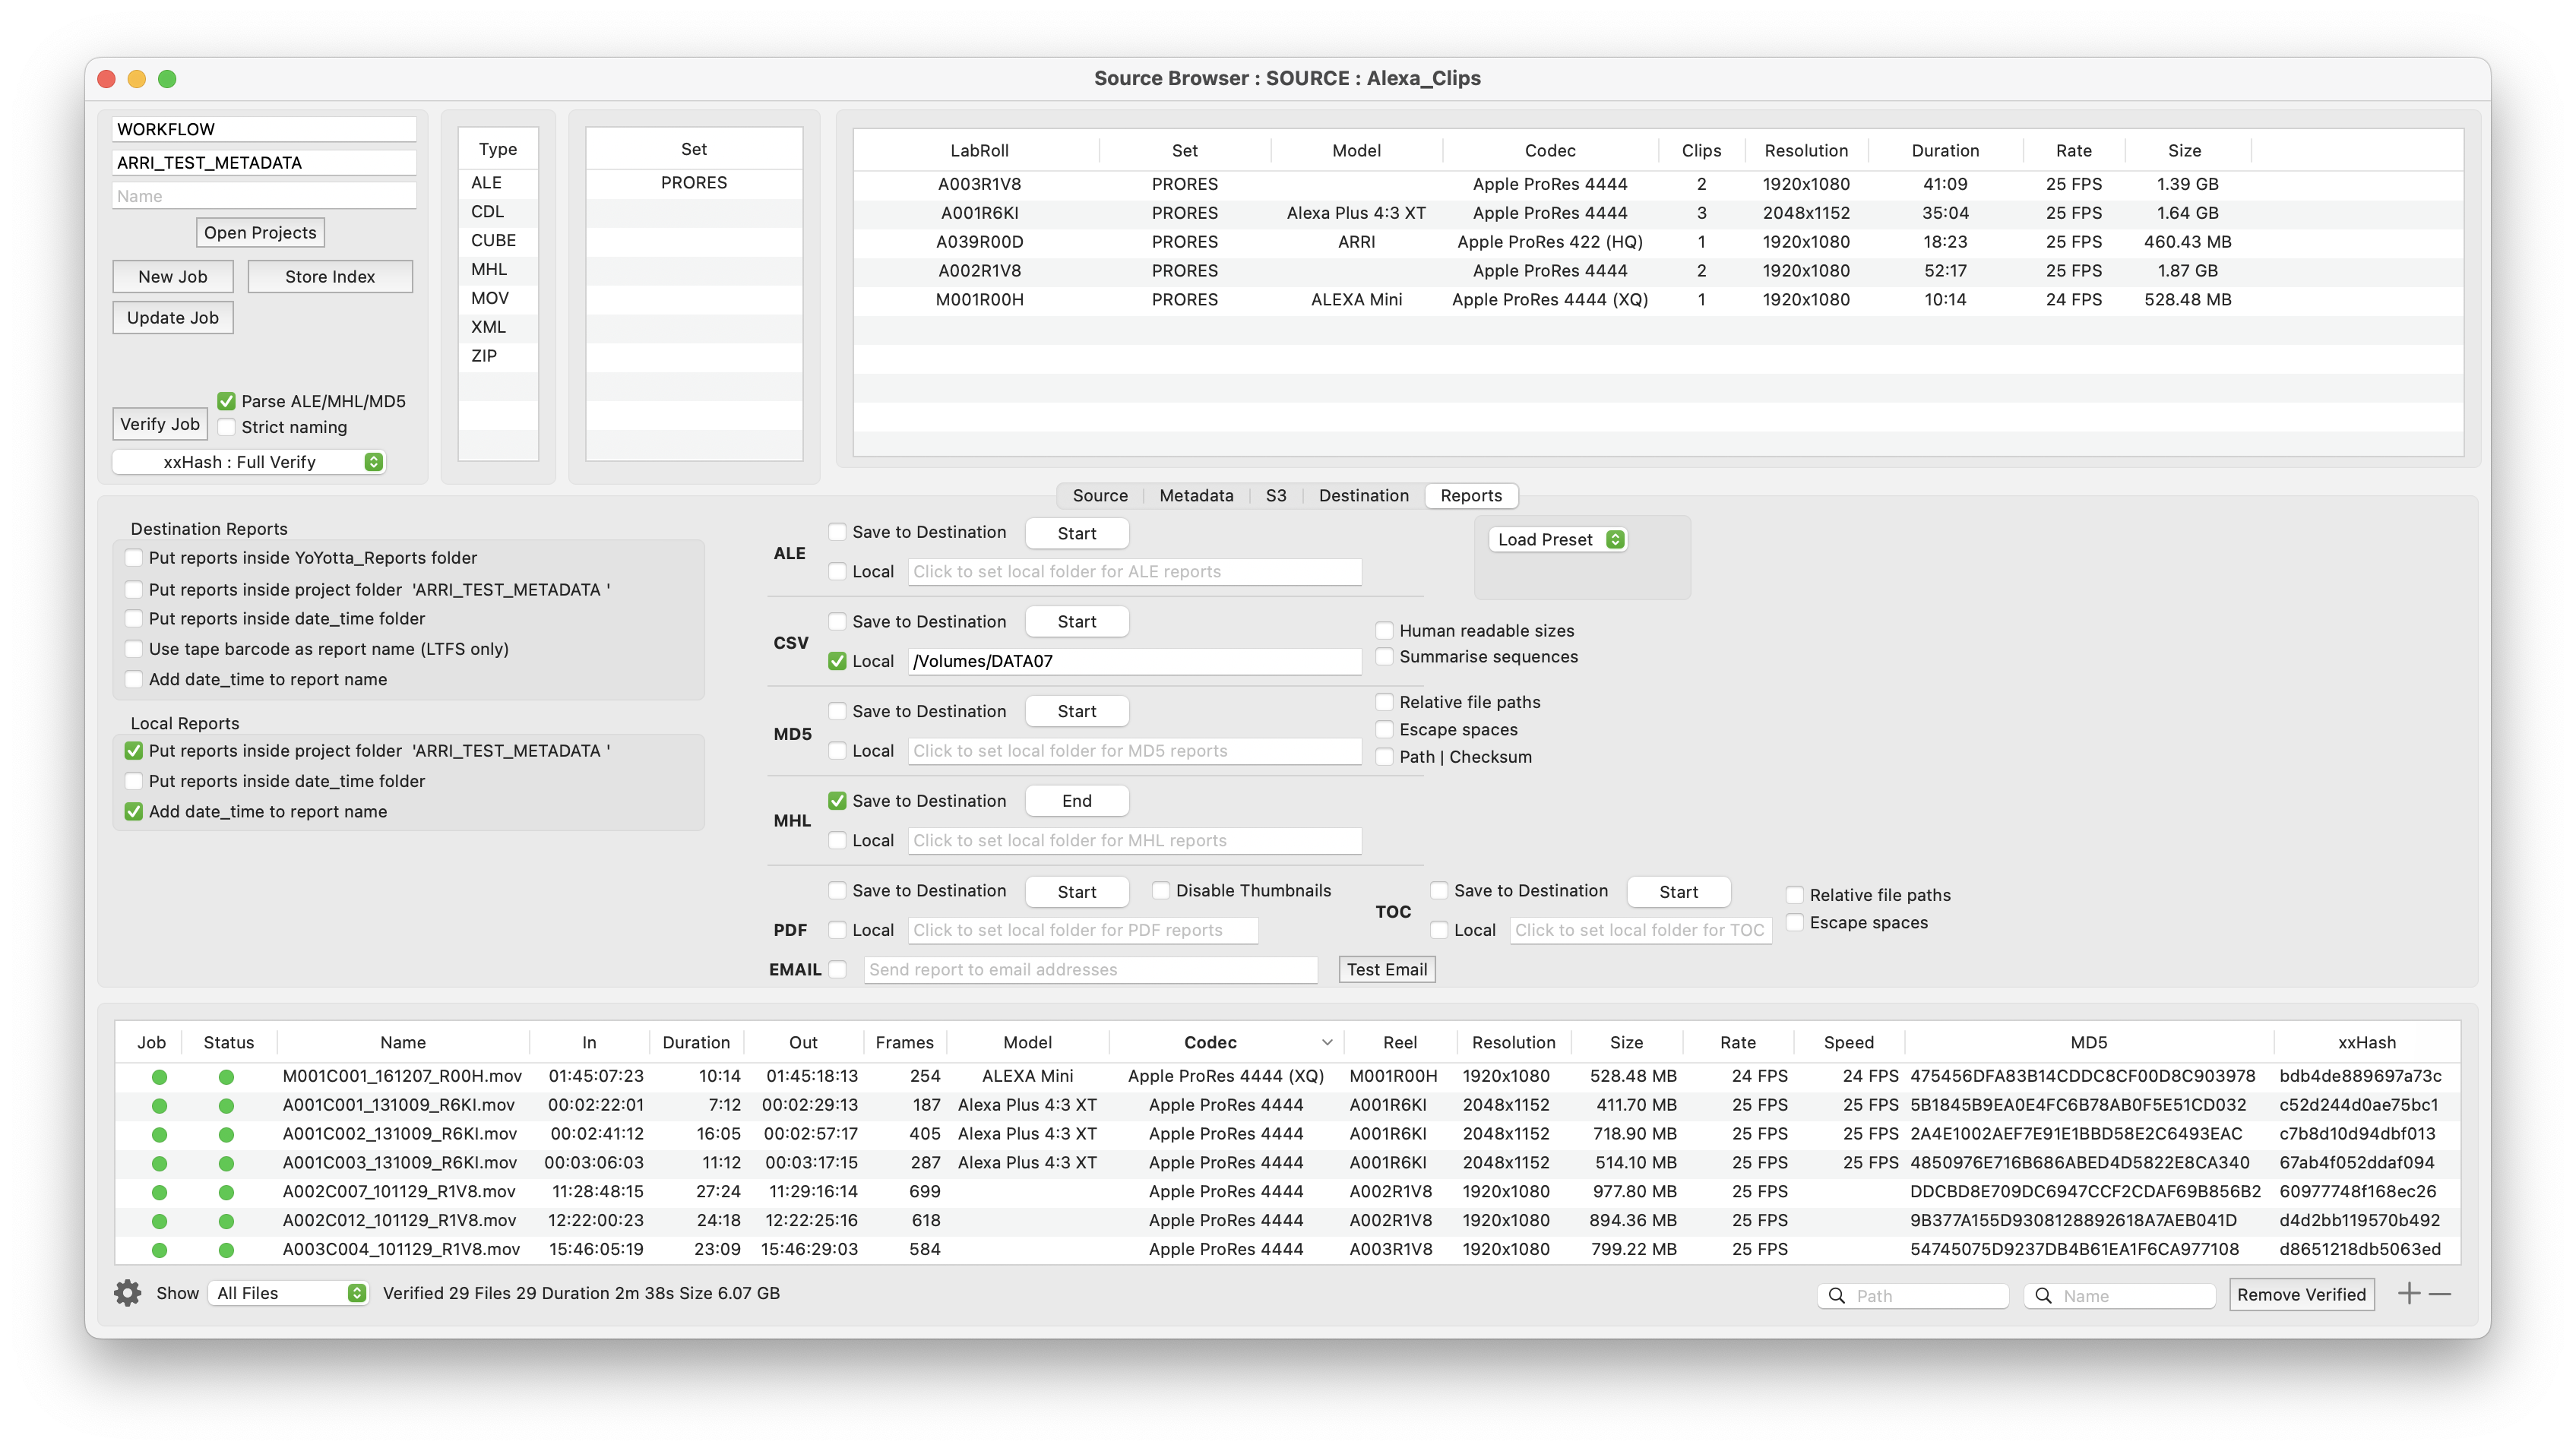
However reports can also be generated automatically for every job. In the Reports tab of the Source Browser turn on local CSV reports and specify a report destination, maybe a shared folder.
Use a cloud synced folder and then when the YoYotta Mac is next online the project metadata can be automatically seen in other locations.
To easily identify each report enable the checkboxes to write the report inside a project folder and to add data and time to the CSV report name.
These report settings should be enabled in every YoYotta job preset if a CSV needs to be generated for every job.
YoYotta will only generate this report if all files are copied and verified, so if the report is there then the infomation in the report about files and their new location is guaranteed to be valid.
When the external software runs it can look in this folder, import new CSV files and update its project database.
There is no requirement for external software to be continuously running meaning that nothing will be missed.
If a user also needs to be notifed by YoYotta about job completion, then enable sending of PDF reports via email.
If external software wants to create a job that will restore certain files it can export a CSV with Path and Name columns. When ready to restore the user can drop this CSV into the YoYotta job table to instantly create a new job.
This approach to sharing clip metadata is simple, can work remotely and the reports provide a permanent time-stamped audit trail.
New columns for additional metadata have been added to the YoYotta CSV files, however the core information has never changed since YoYotta was launched in 2012.
Resetting cached metadata
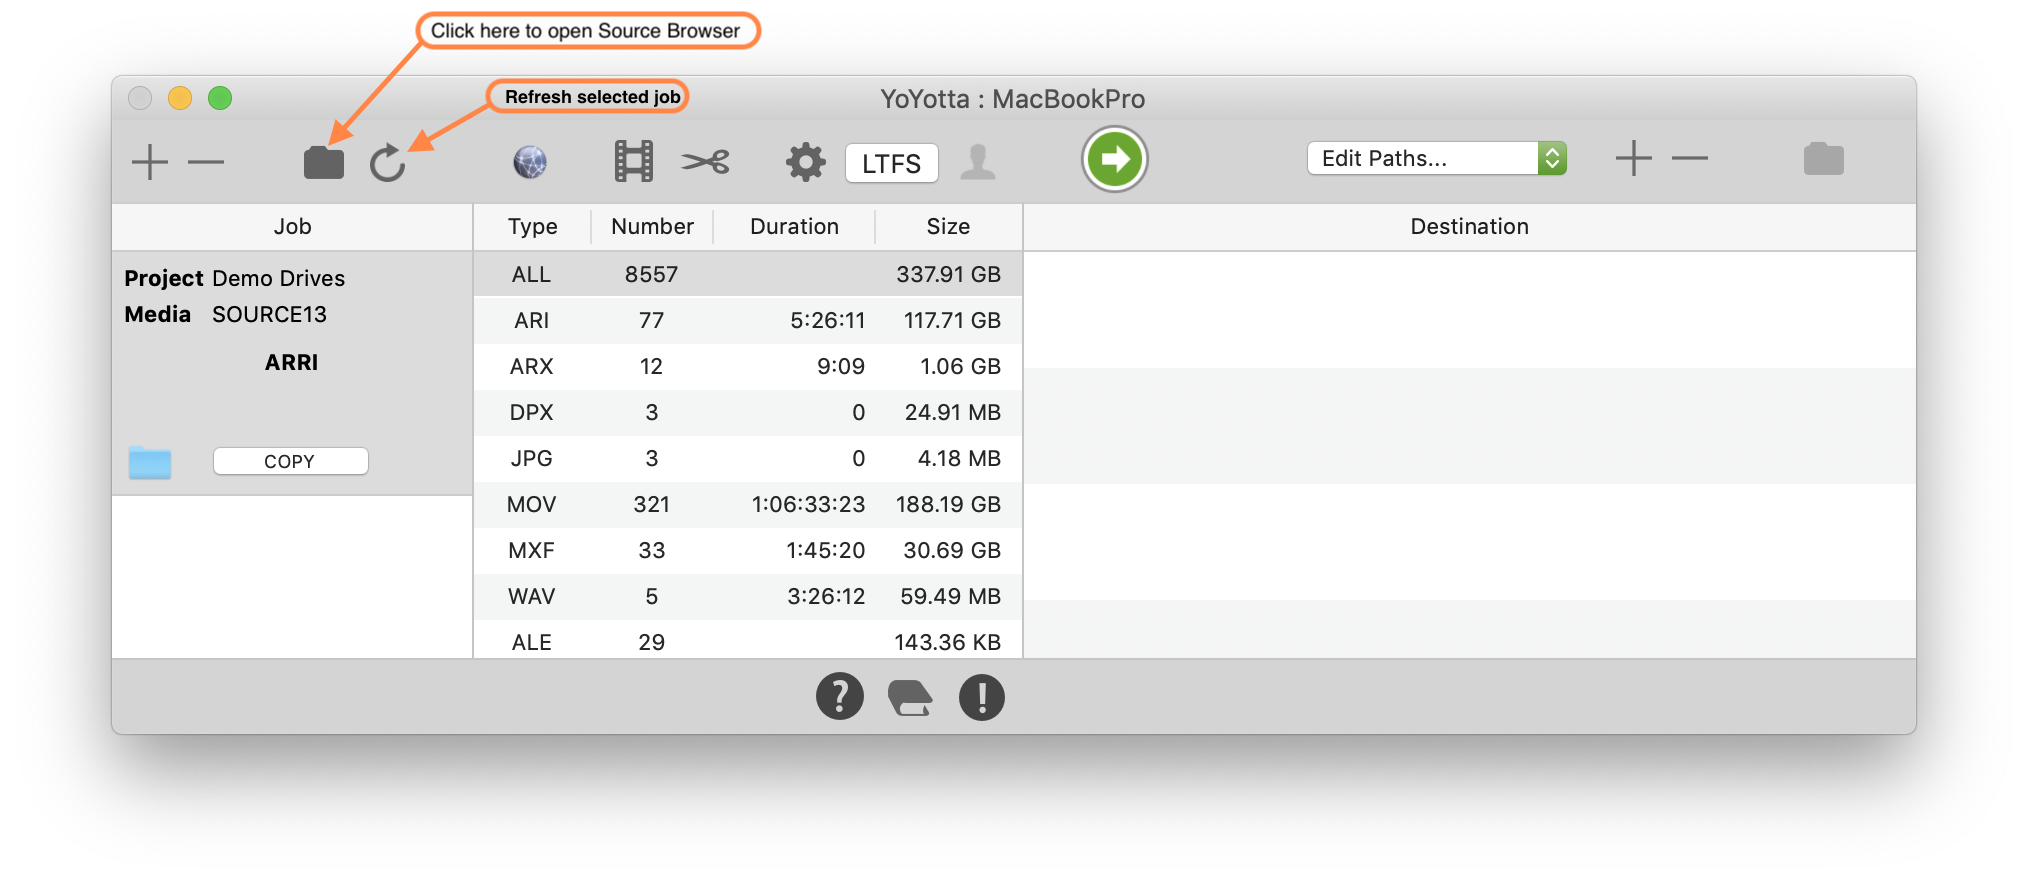
Clicking the refresh button above the job table will reindex the selected job. This will read back the cached metadata for each clip.
Sometimes it's necessary to reset this metadata, for example if there is an new YoYotta version that supports additional metadata for new camera codecs.
To do this hold down the option key and click the refresh button, this will rebuild the clip metadata.
During indexing YoYotta will detect if files have been modified and reset their cached checksums.
However occasionally it may be necessary to manually reset these cached checksums.
To do this hold down the control and option keys and click the refresh button, this will rebuild clip metadata and also reset the cached checksums.
Now open the Source Browser and both the MD5 and xxHash metadata columns will be empty.
Extended attributes
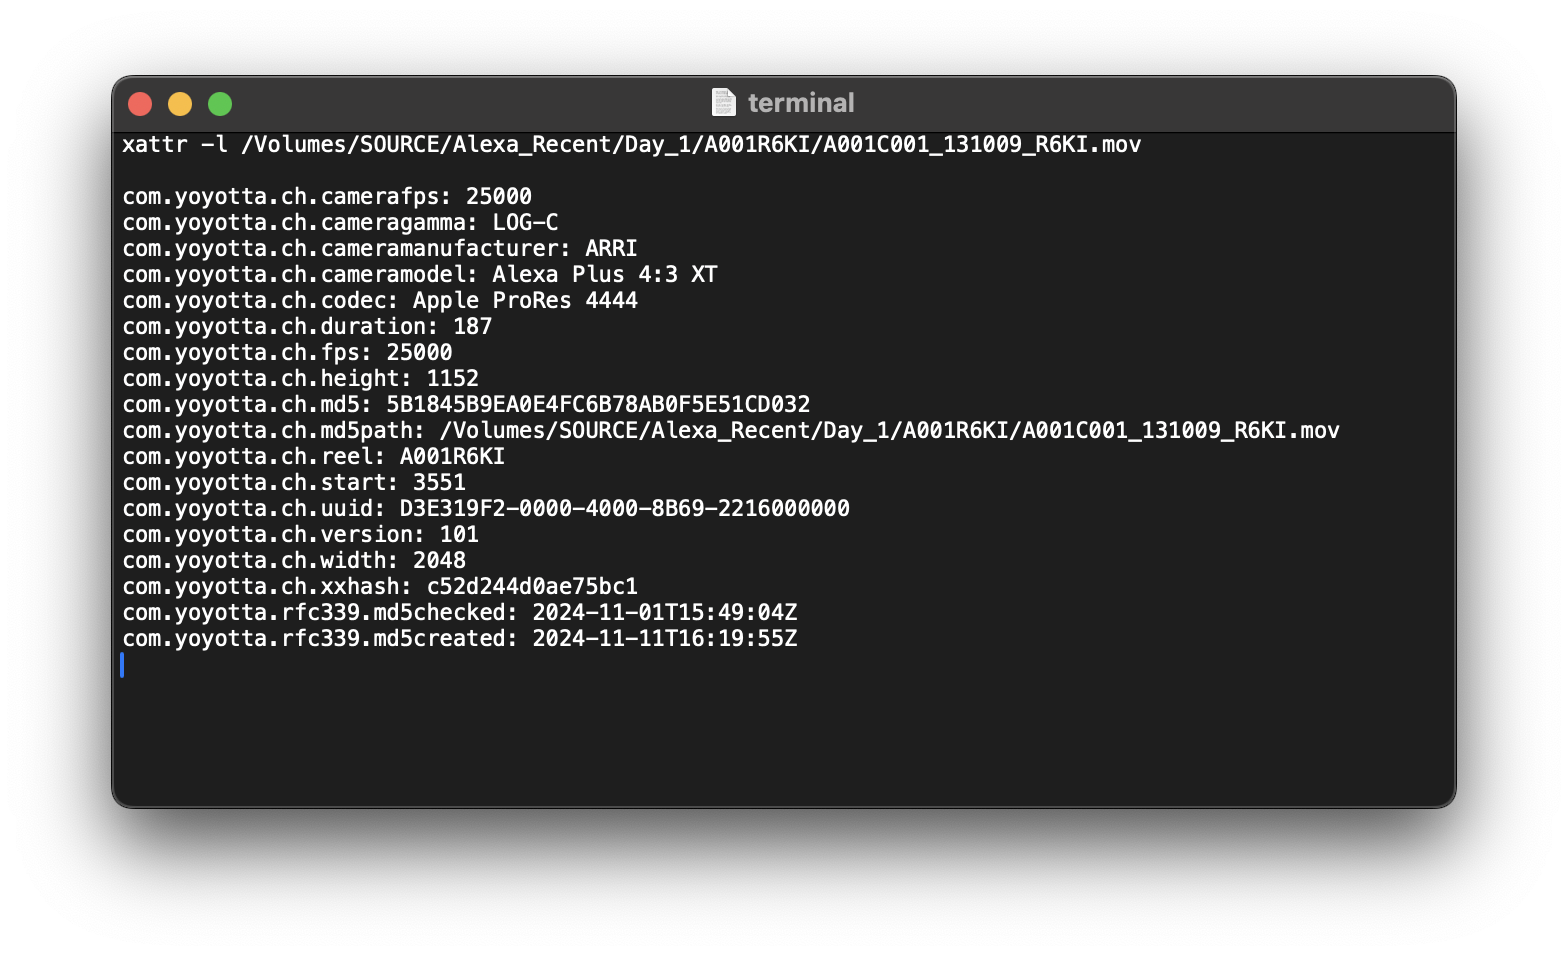
YoYotta caches file metadata including camera clip info and checksums on all file systems that support extended atributes.
Extended attributes can be accessed using xattr commands in the terminal and also by 3rd party applications on Windows, Linux and macOS.
To list the cached metadata, open the terminal and type xattr -l followed by the full path and name as shown here.
On the Mac you can drag and drop the file from the Finder into the terminal to add the full path.
When testing it may be useful to remove extended attributes using the following xattr command.
xattr -c /Volumes/SOURCE/Alexa_Recent/Day_1/A001R6KI/A001C001_131009_R6KI.mov